

How To Change Your Pxe Background Fog Server
Alright, time to tackle Function 2 of this huge Guide: Create Windows 10 Image for Deployment with FOG Server.
At present that we accept our FOG Server up and running, information technology's time to create our Generalized Windows 10 Image with Sysprep and capture it with our FOG Server for Deployment.
🚀 This article has been updated in Nov 2021
Tabular array of Contents
- Earlier you lot start
- Part ane: Installing Windows x in a VirtualBox VM
- Part 2: Inbound Audit Mode
- Part 3: Re-Enabling the Internet Connection
- Part 4: Installing VirtualBox Guest A3uditions (Optional but recommended!)
- Office five: Installing the Windows ADK
- Office 6: Customizing Windows
- Part 7: Creating an Reply File
- Converting install.esd to install.wim
- Creating the Reply File using Windows Organisation Image Manager
- Update August 2019 (Only if y'all have problems with the footstep above)
- Creating a Distribution folder
- Part 7.5 (OPTIONAL): Remove terminal used Folder / Files
- Part 8: Running Sysprep
- Function 9: Capturing our Image with FOG Server
- Part 10: Capturing our Prototype
- Part 11: Deploying the Prototype
- Decision Create Windows 10 Image for Deployment with FOG Server
- ADDITIONAL INFORMATION REGARDING WINDOWS SERVER DHCP + EXTRAS
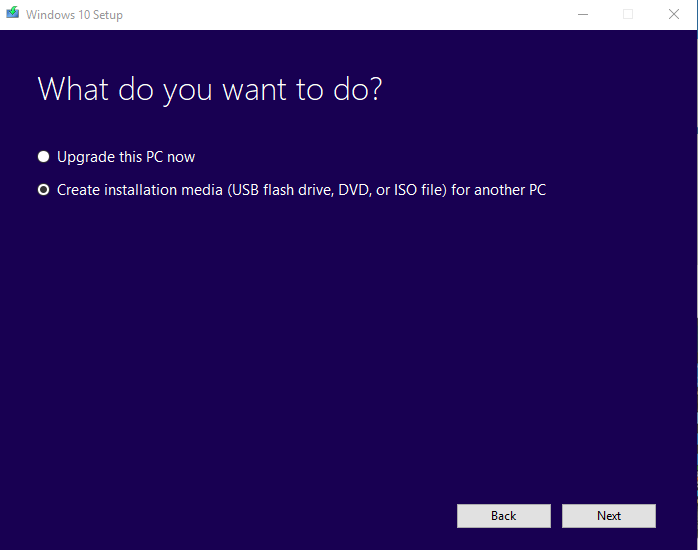
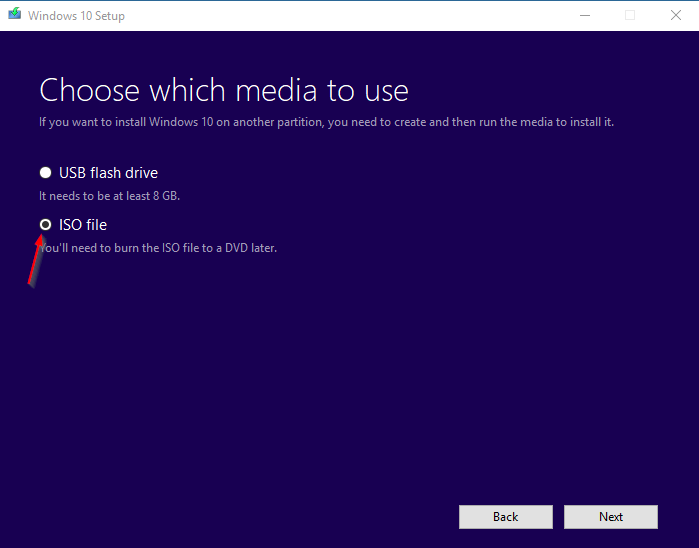
Kickoff things outset: Download Windows 10 with the Windows x Download Tool. Make sure you create an ISO File.
Earlier you start
- Make sure that the VM you are going to install Windows ten on, or the concrete calculator, has NO Net CONNECTION UNTIL Nosotros ARE IN AUDIT Fashion! This is extremely important considering Windows might activate itself in the installation procedure, given an active Cyberspace Connection.
- Don't enter a product key obviously
- Once we are booted into Audit Manner, we volition re-enable the Net Connection to Download the Windows ADK and Software we desire to install.
Continue Microsoft'southward Reimaging Rights in listen to Create Windows ten Image for Deployment with FOG Server!
Thanks to a Reddit User who pointed that out: To create a Golden Paradigm with Windows 10, you need to have i unmarried Volume License for this particular Prototype.
You can acquire about this here.
Part one: Installing Windows 10 in a VirtualBox VM
Start VirtualBox and click on New to create a New Virtual Automobile.
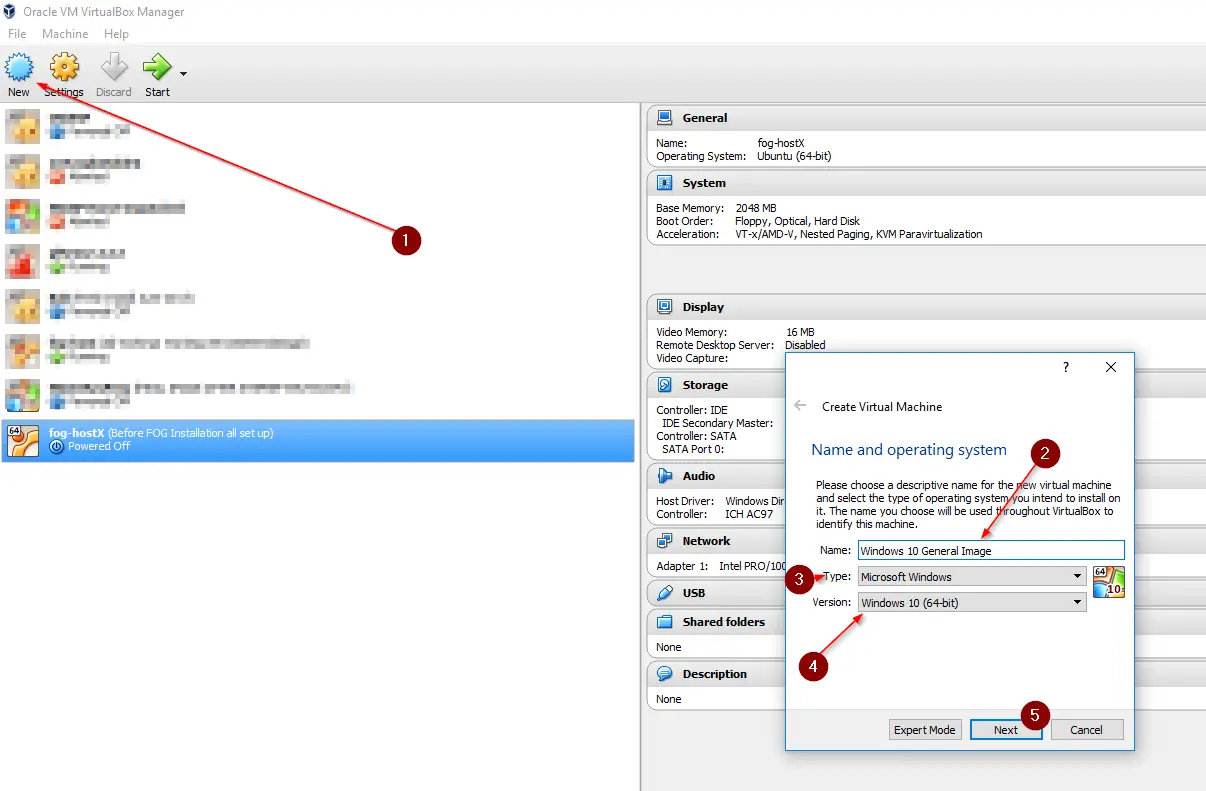
Requite information technology a descriptive Name and select Windows 10 64 scrap.
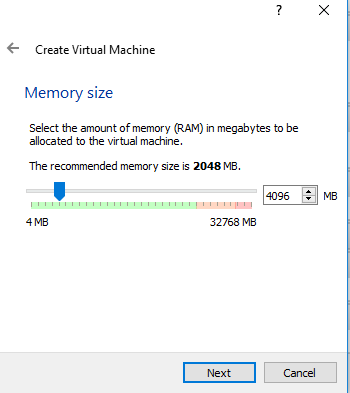
Now classify equally much RAM as you could spare. 2GB is plenty, iv is better.
Create a Virtual Hard disk Now.
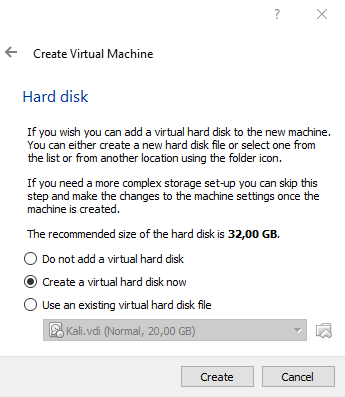
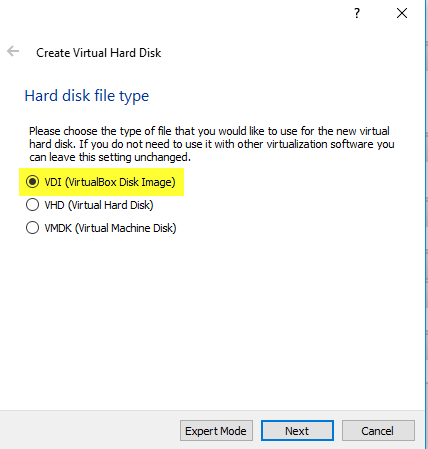
Choose VDI every bit Hard Disk File Blazon
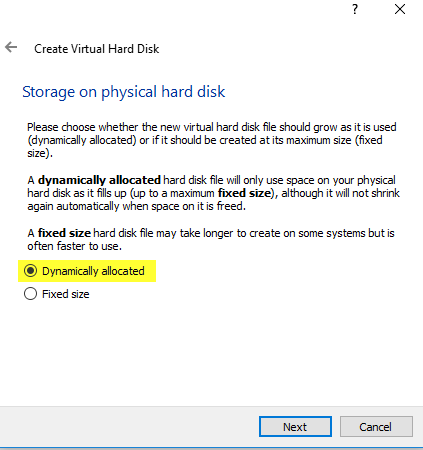
I'll opt for Dynamically Allocated.
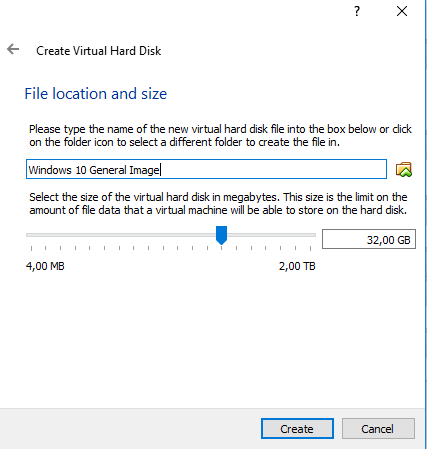
And I'll keep the File Size at the Recommended 32,00GB. This highly depends on what you plan to install on the prototype, so if you want to install lots of software, adjust the size accordingly.
You tin besides choose a dissimilar location where you lot want to save the VDI file by clicking on the Folder adjacent to the Name of the VM.
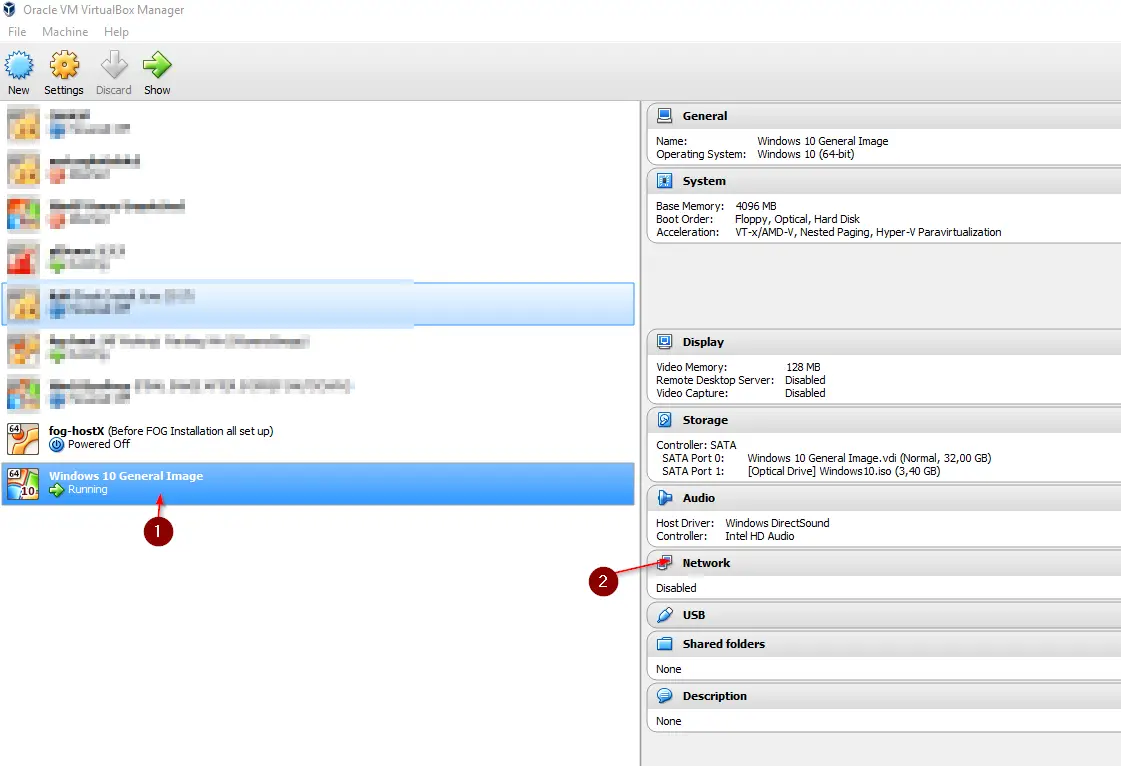
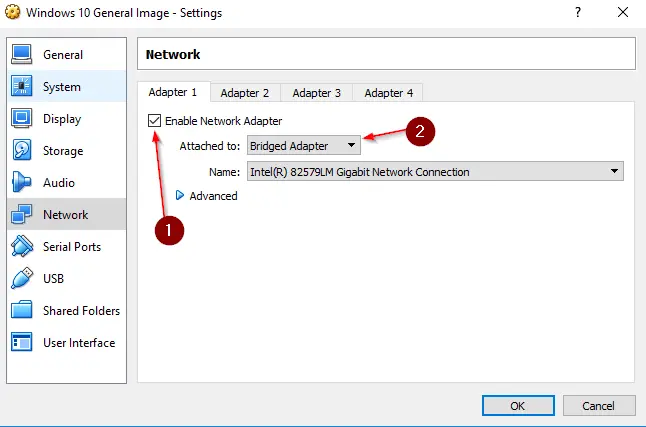
Next, we demand to make sure that the Internet Connection is disabled.
Select your Windows x General Epitome and click on Network.
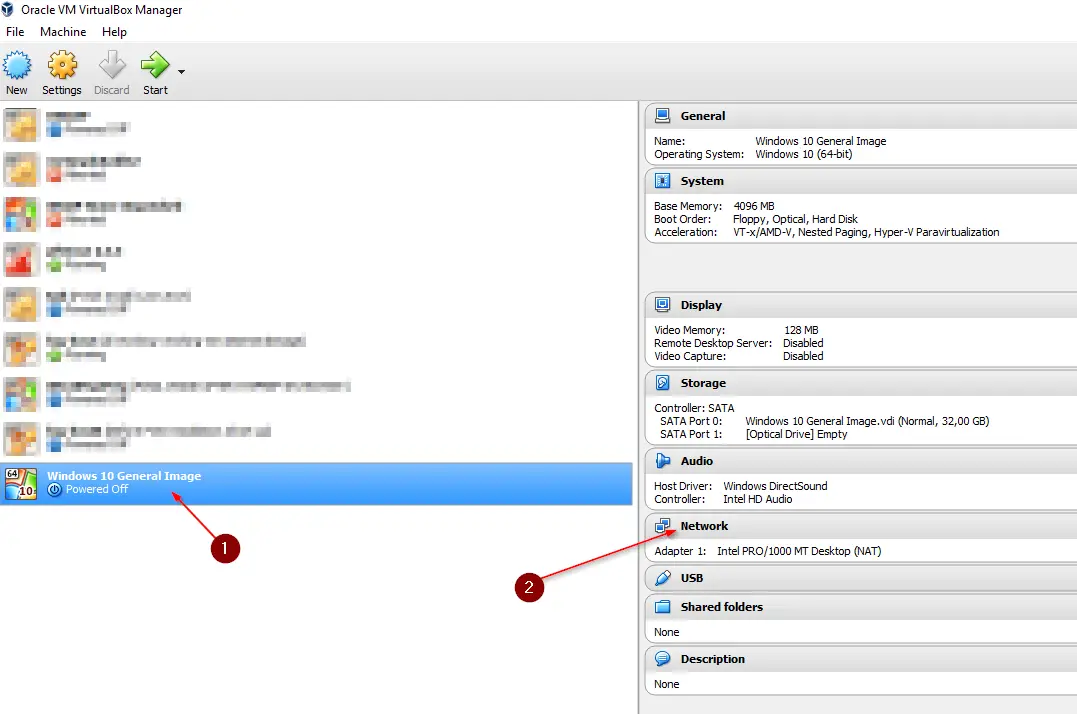
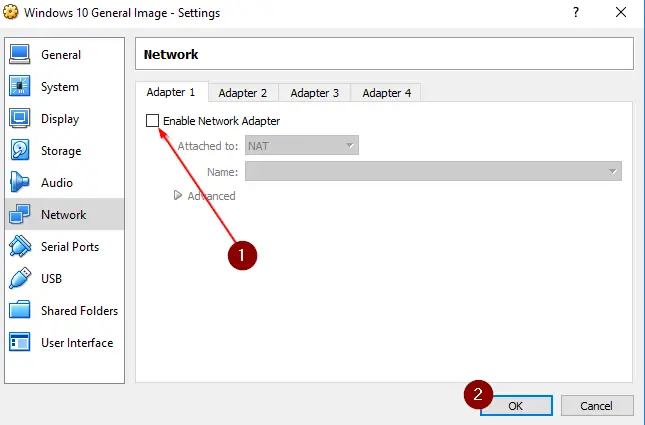
Uncheck Enable Network Adapter and click on Ok.
Now start your Virtual Machine.
Select the Windows ten Prototype you downloaded earlier by clicking on the little Binder Symbol.

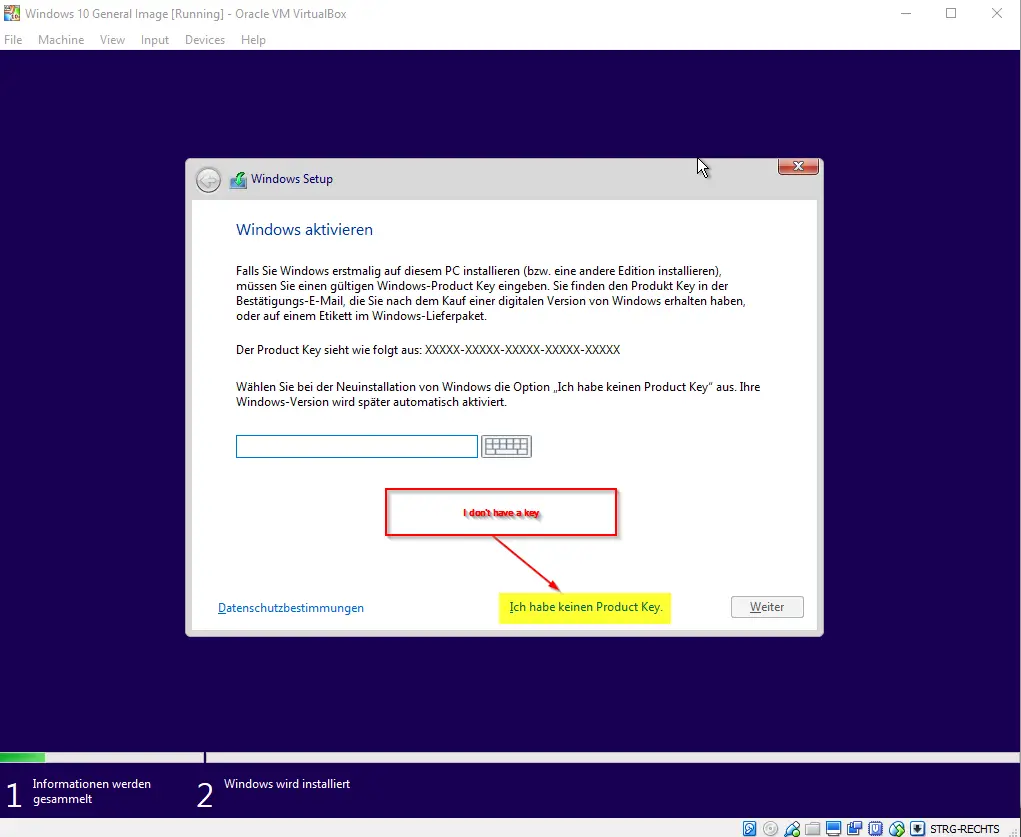
Now ordinarily follow through the Installation Process. When you are getting asked for a key, click on I don't have one. (excuse the German screen, I only have the German image)
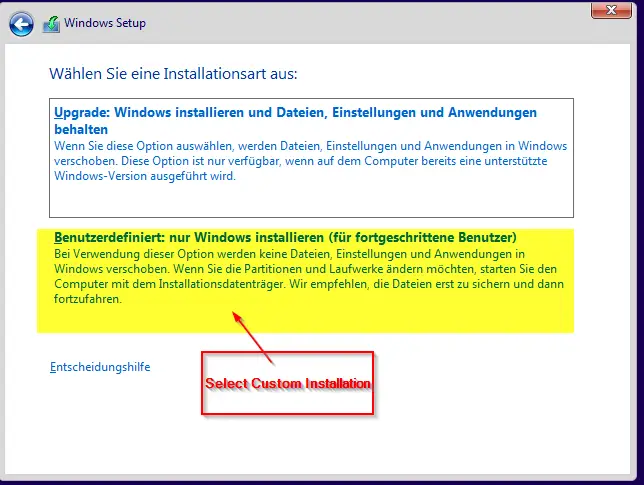
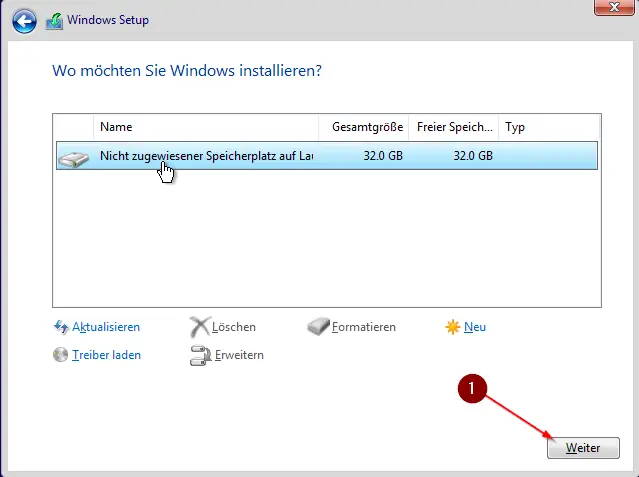
On the next screen select Custom Installation.
Select your only Difficult Drive and click side by side.
Now allow the installation run through until you lot come to the kickoff dialog later on all the reboots are done, don't press annihilation!
Part 2: Entering Audit Mode
After the reboots are done, this should exist the start screen yous will come across: (as of August 2019)
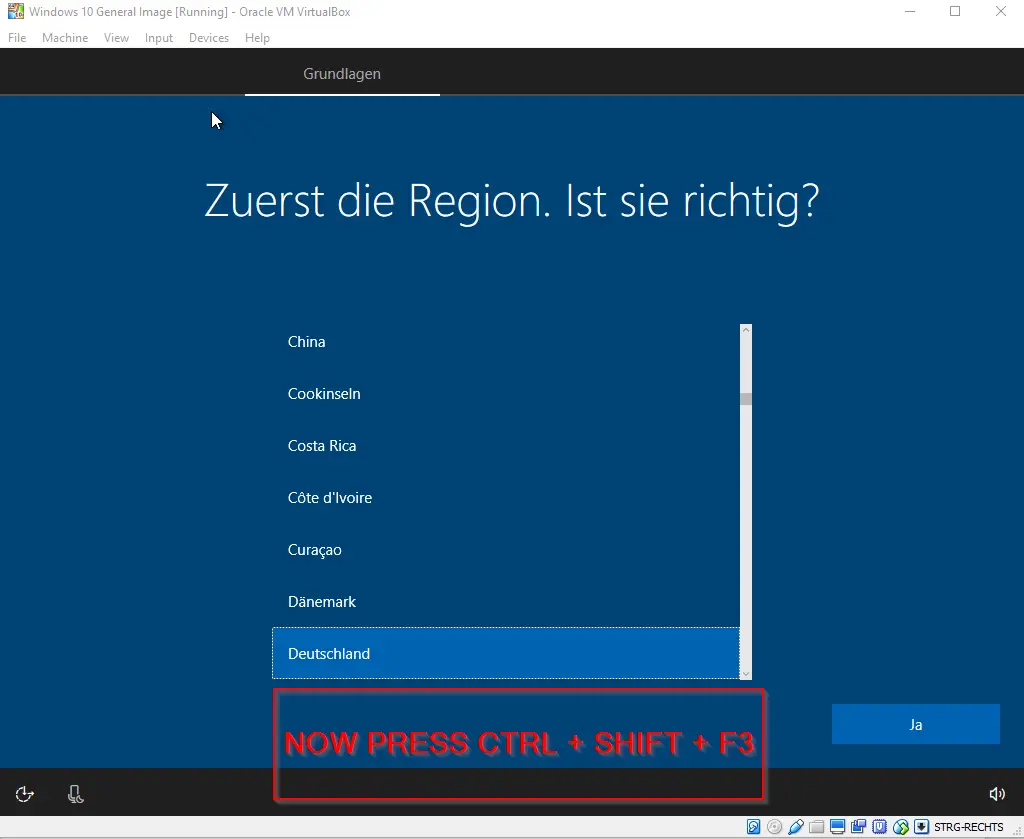
Now press CTRL + SHIFT and then hitting the F3 key. Windows will now reboot into Audit Style.
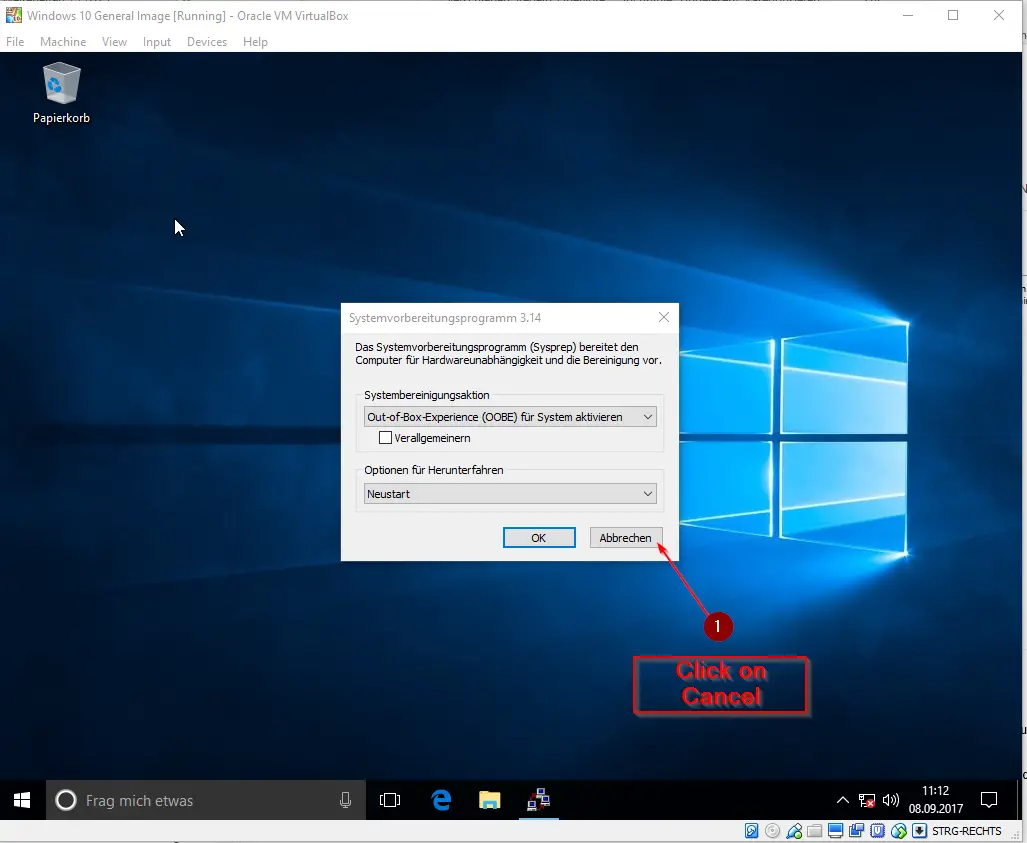
Click on Cancel on the first Dialog. That's the Sysprep Dialog that pops up automatically, but nosotros'll do that later manually.
Part iii: Re-Enabling the Internet Connection
At present we can safely re-enable our Cyberspace Connection to Download the ADK.
You lot can shut down your Windows 10 now, it will automatically boot upward in Audit Mode again. We need to shut information technology downwardly to re-enable the network connection.
Later on it'south shut downwardly, select your VM and click on Network once again.
Enable either Bridged Mode or NAT, both will work.
Start your VM once again. After it's booted up, cancel the Sysprep Dialog again.
Function 4: Installing VirtualBox Guest A3uditions (Optional just recommended!)
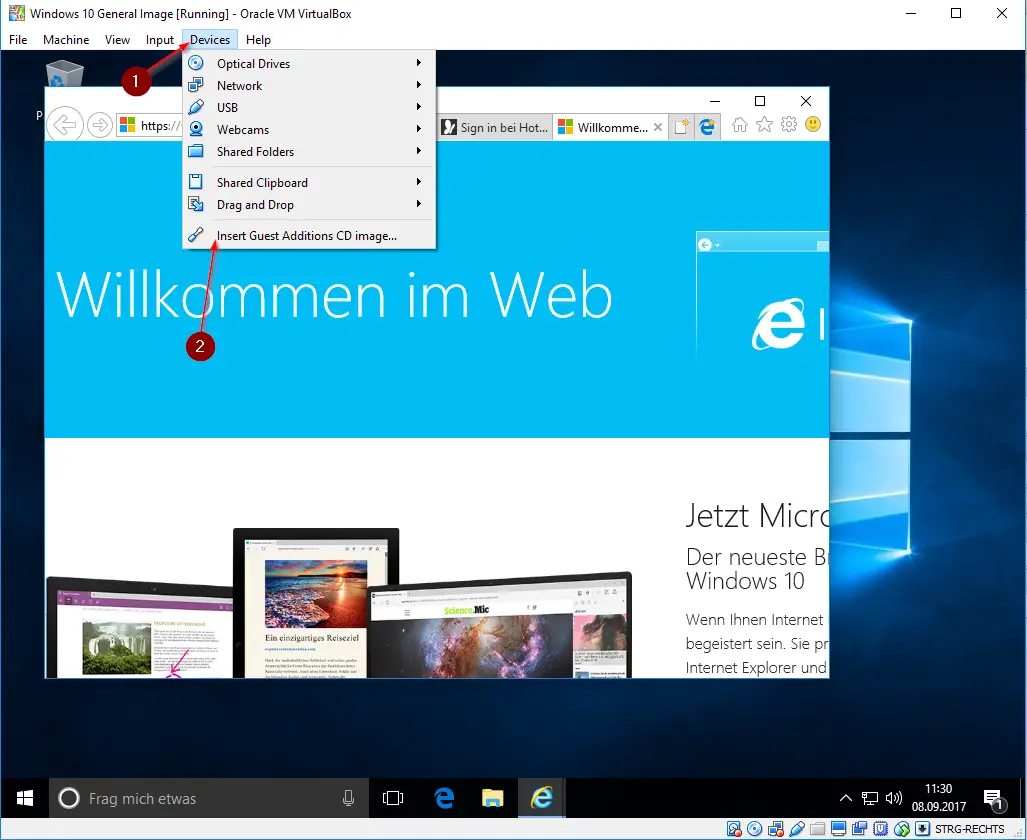
One more than side-footstep we can take for our convenience before is to install the VirtualBox Guest Additions. So nosotros volition be able to copy & paste stuff from our Host Figurer to our VM. This is optional but recommended.
But click on Devices and Insert Invitee Additions CD Epitome...
After that, open up your CD Drive and run the Installation.
Simply follow through the installation and concord to installation everything you're asked to.
Reboot your computer.
Cancel the Sysprep Dialog in one case more than.
Click on Devices again, select Drag & Driblet and Choose: Bidirectional
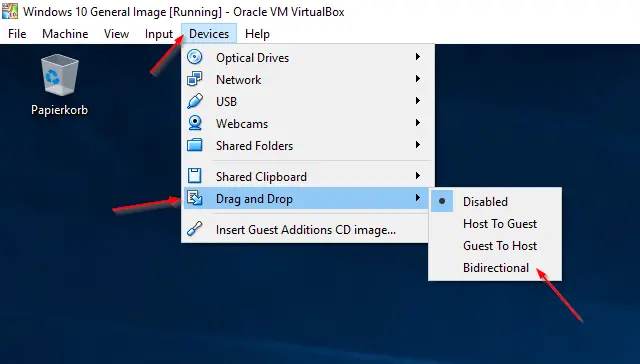
You will exist able to Copy & Paste Link Addresses and Elevate & Drop Files from your Host Reckoner to your VM.
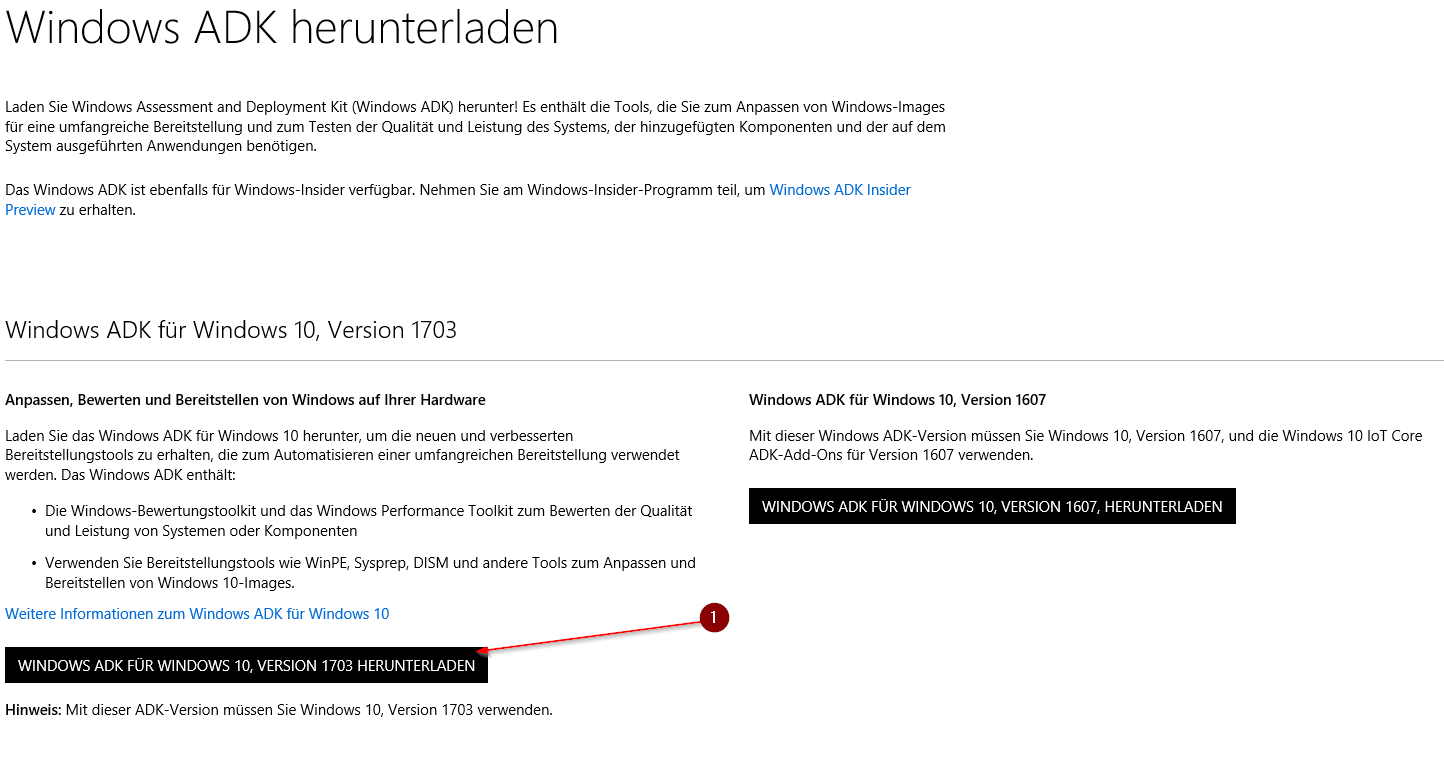
Role 5: Installing the Windows ADK
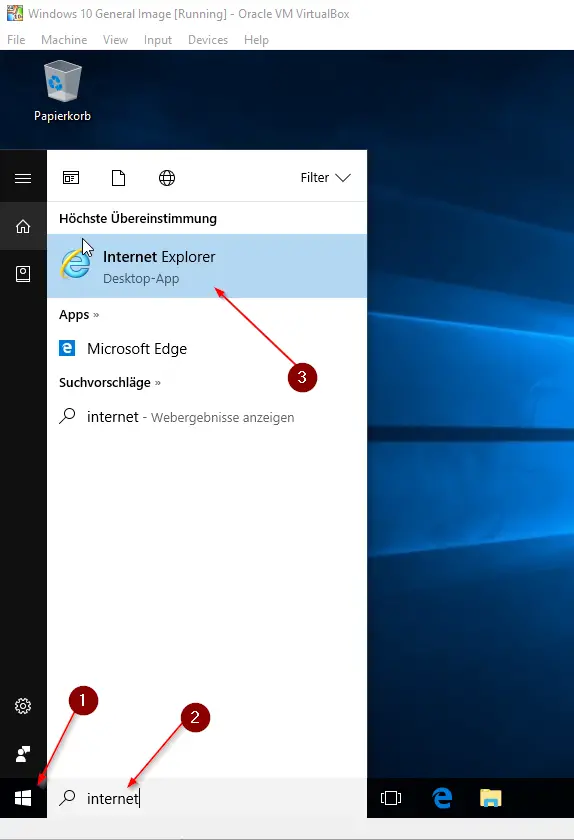
Now open Cyberspace EXPLORER, non Border. Edge will not work hither.
Go to this link: https://msdn.microsoft.com/en-gb/windows/hardware/dn913721.aspx
And Download the Windows ADK.
Y'all should download Windows ADK for Windows 10 Version 1903, or whatever the newest version will be.
You can detect out which Windows Version you accept here.
Click through the routine leaving everything on default (Expect perchance if you don't desire to send anonymous data to Microsoft, untick that), until you come to the part where you can choose what to install.
Uncheck everything except Deployment tools:

Finally, click on Install.
Alright, afterward this is done we can start customizing Windows.
Optionally, you can accept a Snapshot of the automobile state now (Recommended!) to revert to a fresh installation state afterward if you need to.
Office 6: Customizing Windows
First I will tell you what you can customize:
- Desktop Icon Spacing and Sizes.
- File Explorer Settings
- Screensaver
- Windows Wallpaper
- Windows Icons, Sounds, Themes and Colors
All those settings, when modified in Inspect manner, will be saved in the Default User Profile. Meaning, every user that you lot will add to this machine later (Fifty-fifty Domain Users), will take those settings applied to them. It works very well in a Domain environment, as well.
Now y'all can besides get ahead and Install every Software you lot want to have bachelor on your General Image.
For Example:
- Office
- VLC Role player
- Antivirus
- etc
You can become to Ninite.com to make the installation easier.
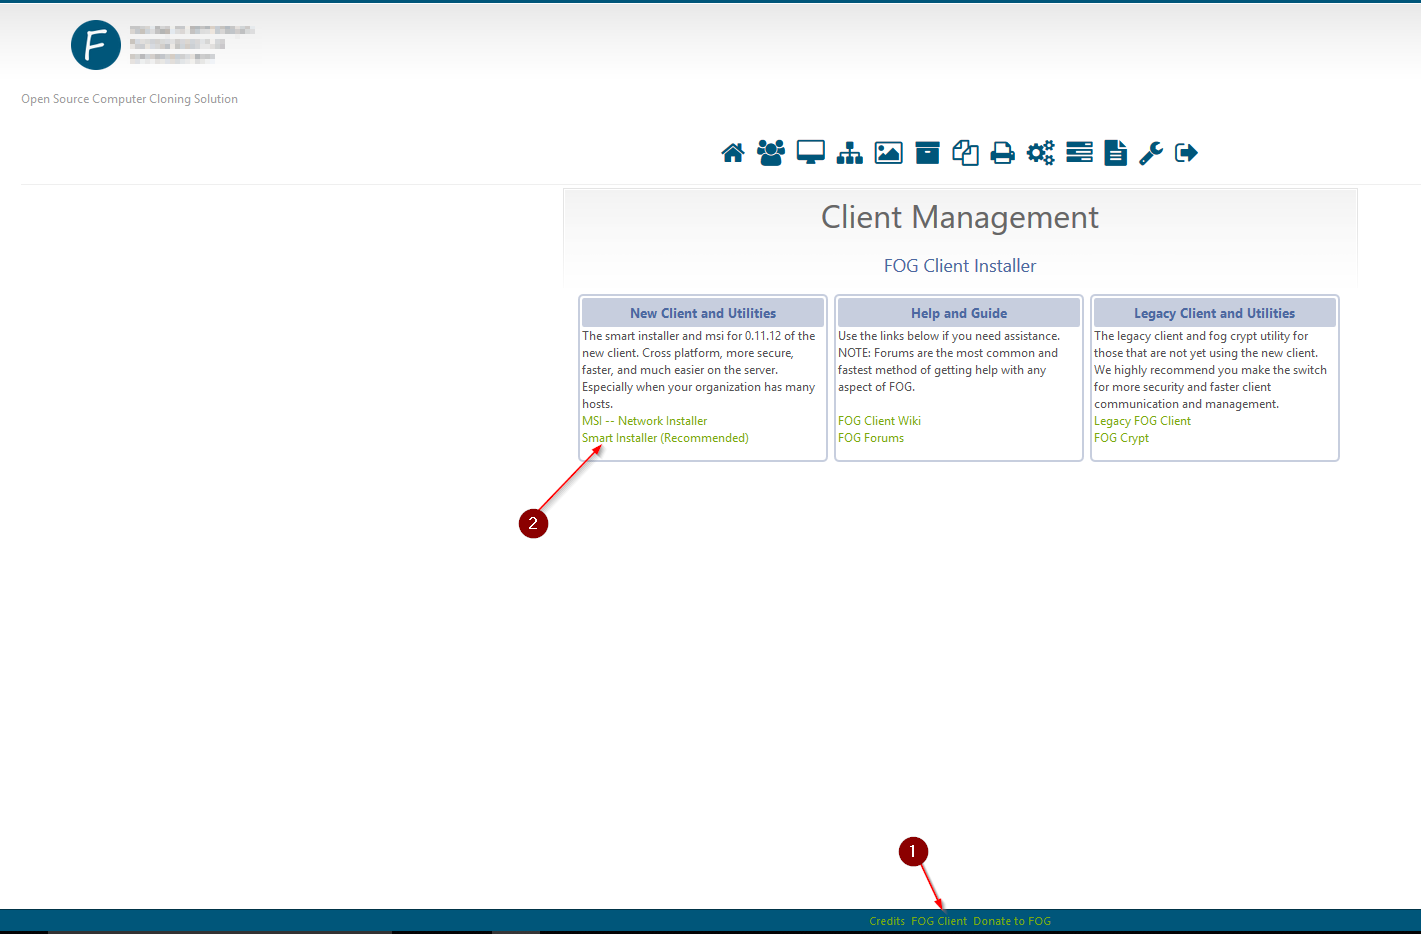
Now we are going to likewise install the FOG-Client.
I presume that y'all won't have just 1 single Laptop or Desktop Model but several different. That's where the FOG Client comes into play. It allows y'all to use any Computer Model you lot want.
Just open HTTP://<Your Fog Server IP>/fog/client or simply open an case of your FOG-Server in the spider web browser and notice "Fog Client" on the bottom of the page. Download the Smart Installer.
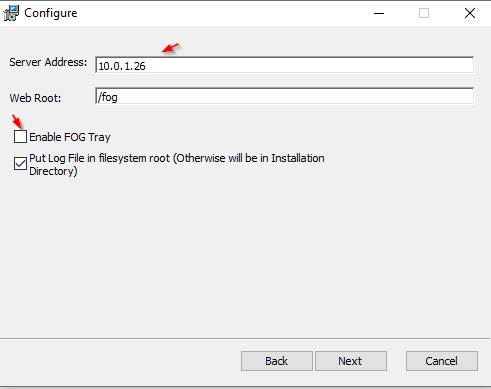
Enter the IP address of your FOG Server and leave Spider web Root as default, except you changed the default Web Root, of grade. And then deselect "FOG Tray" to hide the FOG symbol from the taskbar, so the user tin can't come across it.
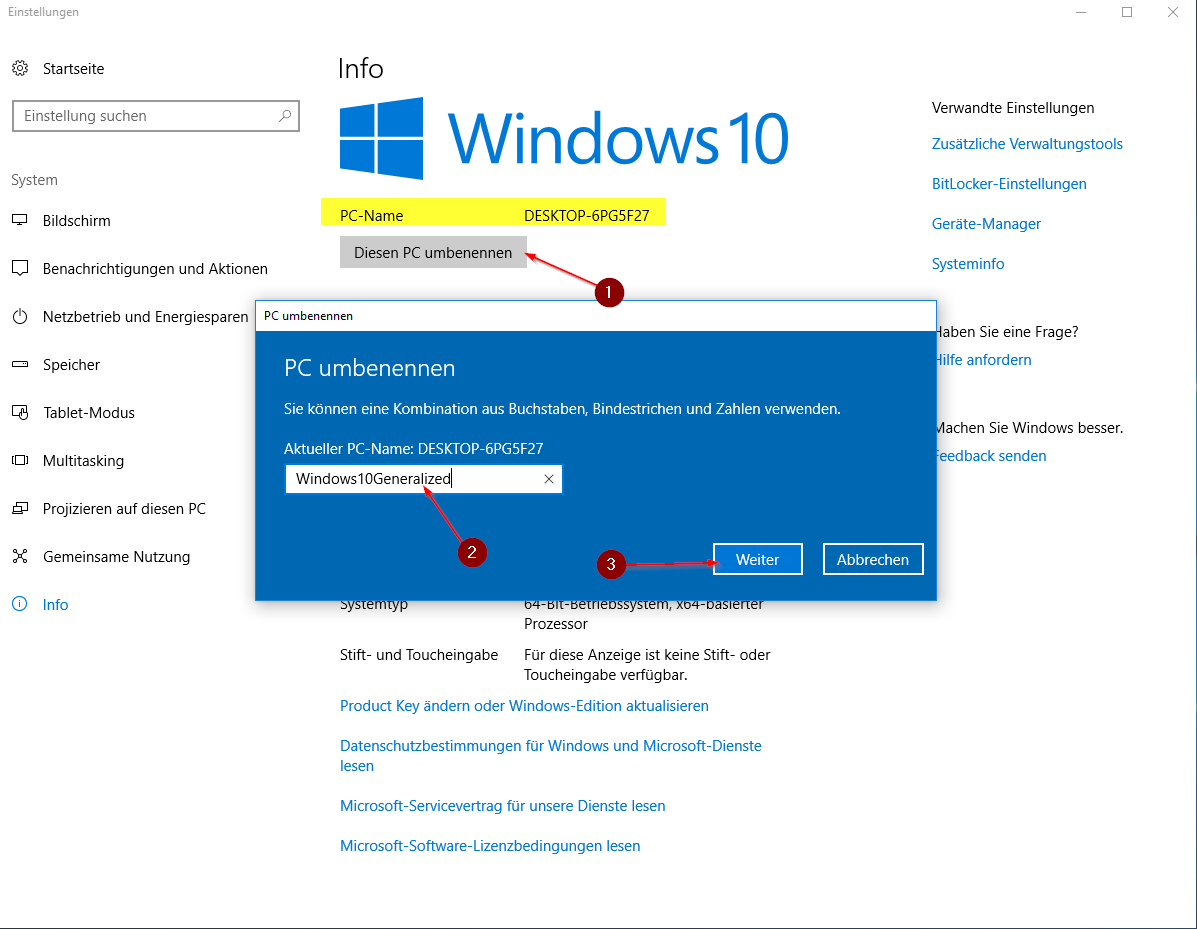
After y'all got everything installed, I would recommend you to change the computer proper name to something less generic.
Simply hit the Windows Primal and blazon: Name
Select Show Estimator Proper name and change it to something descriptive.
Reboot your organisation. Cancel the Sysprep Dialogue one more time.
Part 7: Creating an Answer File
Now we need to create our Answer file that tells Sysprep what kind of changes we want to take applied to our Image.
Start, we need to put back our Windows 10 Image into our VM, so Sysprep can access the installation medium.
Click on Devices -> Optical Drives and Select your Windows 10 Prototype once again.
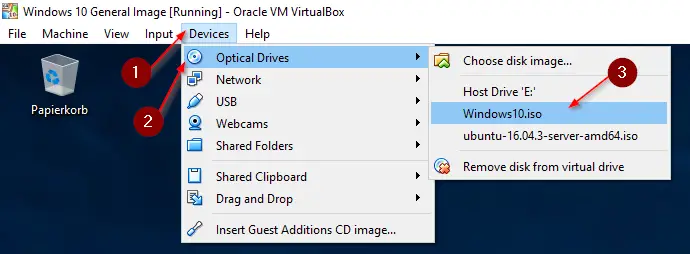
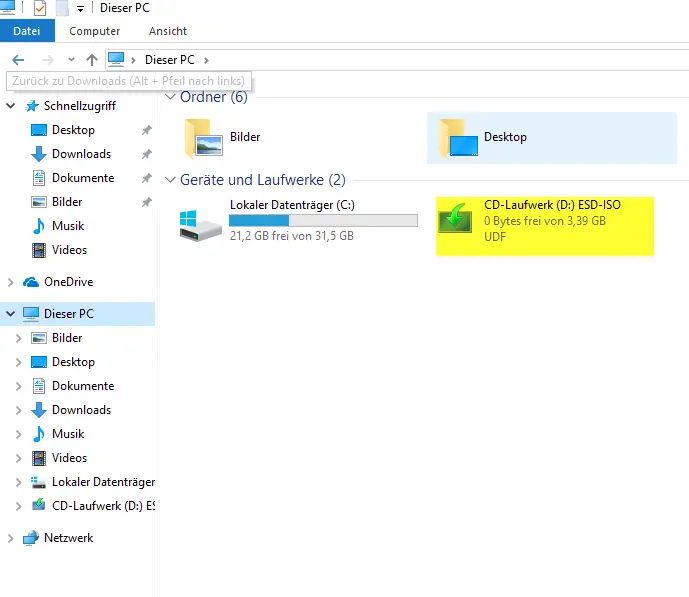
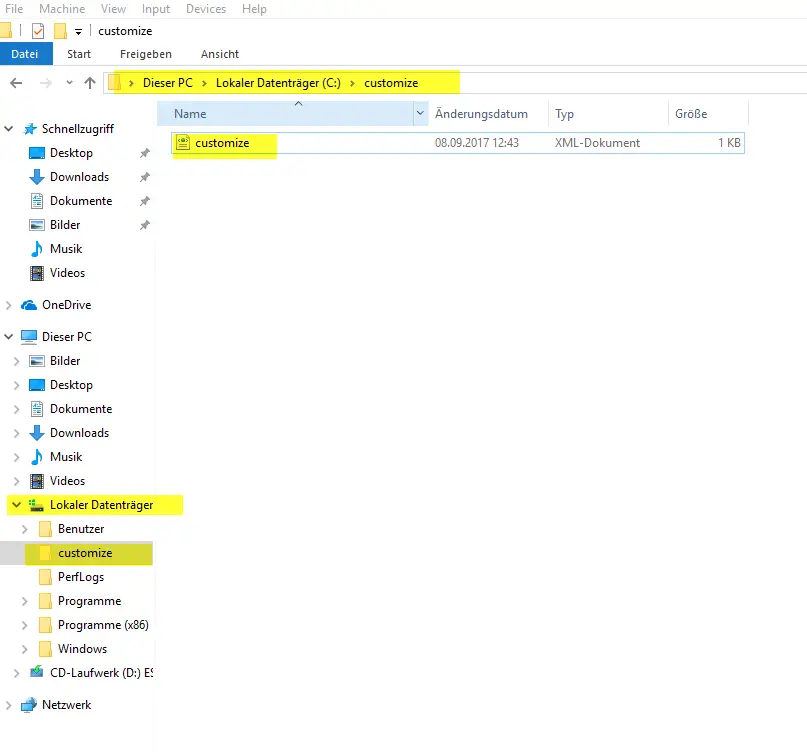
Open up an Explorer Window and open up the Windows 10 Epitome. Select all files and copy them.
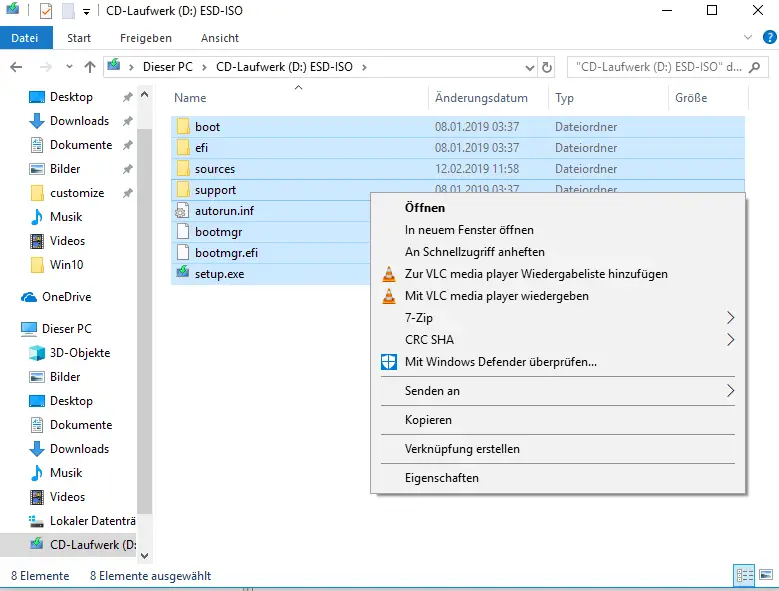
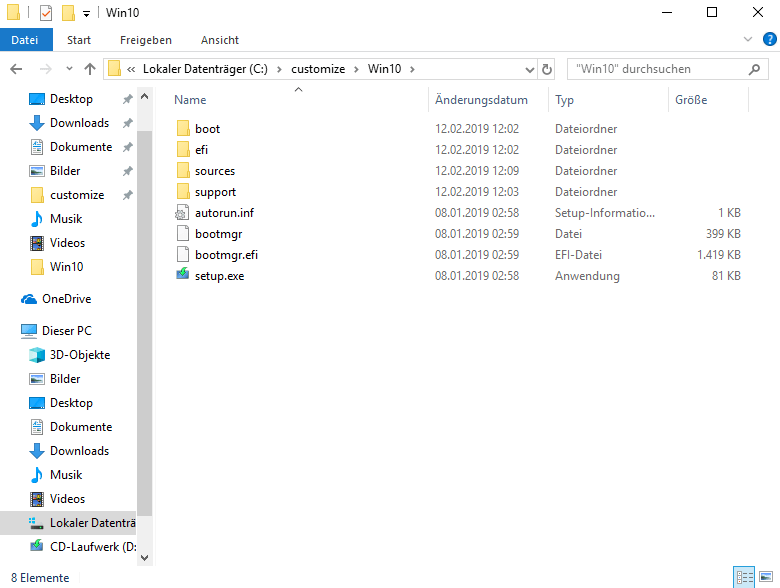
Create a new folder in C:\customize\Win10 and paste the files in there.
Converting install.esd to install.wim
Now we need to convert the install.esd file to a install.wim file then nosotros can utilise it for creating our respond file.
Press your Windows Key in one case more and type "Powershell". Right-click Powershell and select Run equally Administrator. Run the following command next:
dism /Get-WimInfo /WimFile:C:\customize\Win10\sources\install.esd
Now depending on which Windows 10 Version yous want to install, you lot need to choose the correct index number in the next step. Await in the image below.
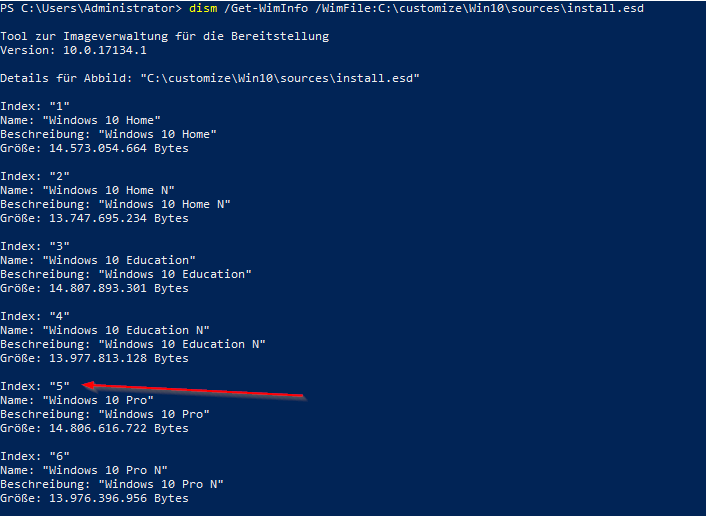
Once you have the number noted, in my case, it's "five" for Windows 10 Professional, we are going to create our install.wim by running:
dism /Export-Prototype /SourceImageFile:C:\customize\Win10\sources\install.esd /SourceIndex:five /DestinationImageFile:C:\customize\Win10\sources\install.wim /Compress:Max /CheckIntegrity
Make sure to adjust the command with your own SourceIndex Number! And make sure the path is the same for Source and Destination.

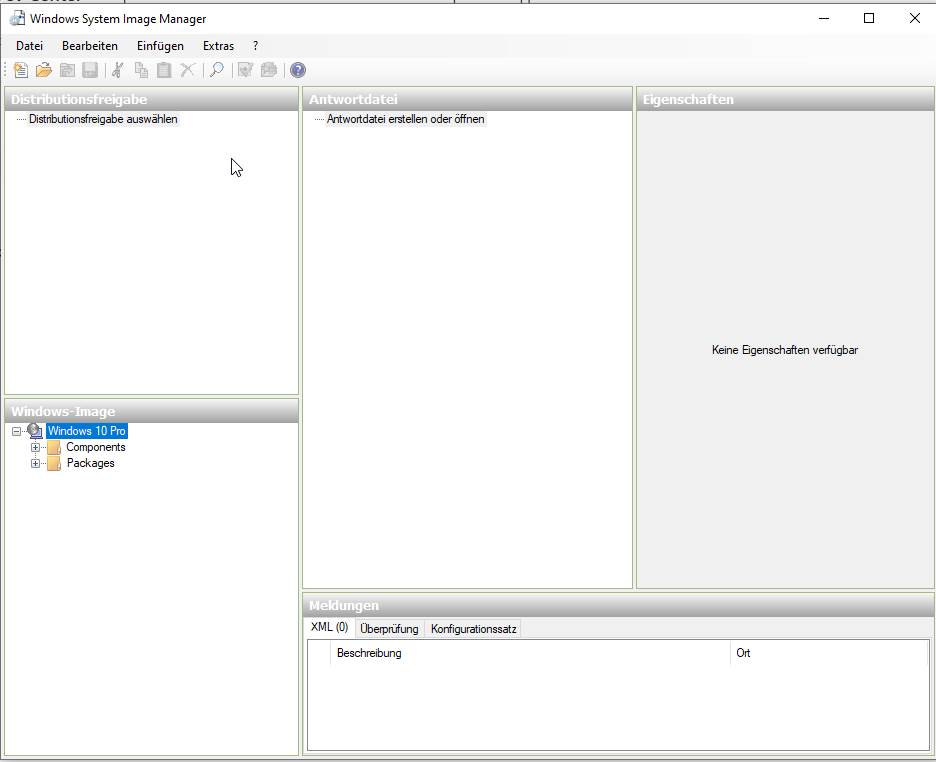
Creating the Answer File using Windows Organization Epitome Manager
Open Windows System Prototype Manager by pressing the Windows Key and typing it's proper noun. Click on File -> Select Windows Image and choose the C:\customize\Win10\sources\install.wim file we just created (Sorry for the German Screenshot). Select YES in the following dialogue. If you go an fault message, follow the updated instructions below.
Update August 2019 (Only if you accept issues with the pace to a higher place)
I regularly get through my tutorials and come across if they all the same work. Information technology seems to be that Windows 10 version 1903 requires an update of the Windows Organization Image Managing director (WSIM). Gladly, the process is actually piece of cake.
- Download this file and excerpt information technology
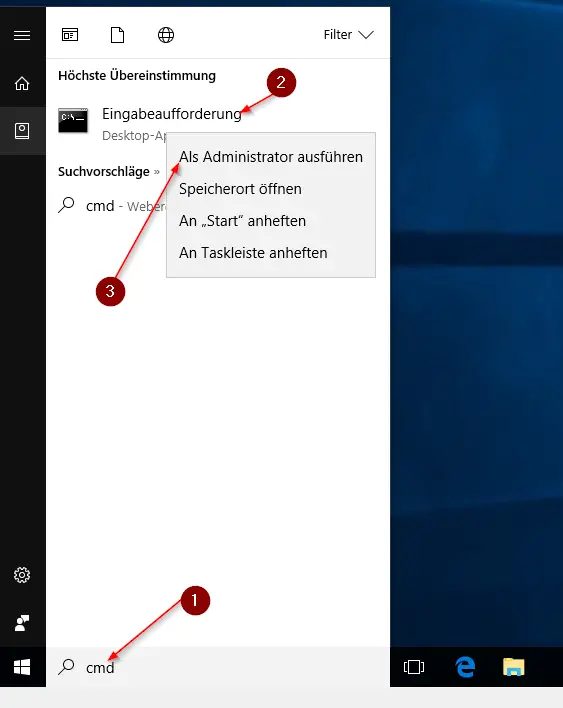
- Printing the Windows Fundamental, type CMD, correct-click the control line and select "Run equally administrator"
- Navigate to the path where you lot accept extracted the file, for instanceC:\Users\Administrator\Downloads\WSIM1903
- Type:
UpdateWSIM .bat
Code language: CSS ( css ) 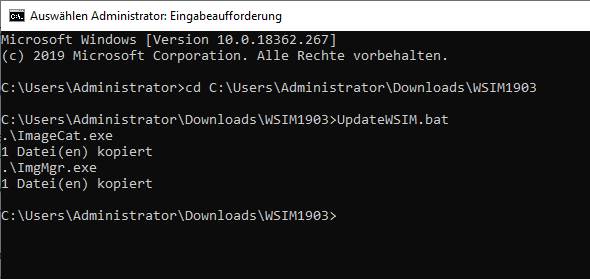
This should solve all problems.
Creating a Distribution folder
Create a Binder chosen Distribution in C:\customize\ and within this Binder create 4 Subfolders:
- $OEM$
- LangPacks
- Out-of-Box Drivers
- Packages
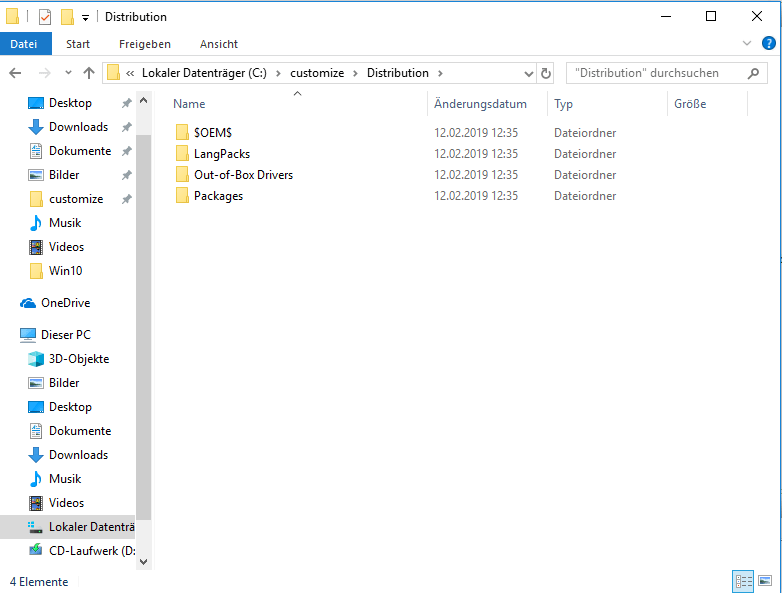
Next back in Windows System Prototype Manager Click on File -> Select Distribution Share. Select the Distribution folder we just created and click on Ok.
Next click on File -> New Answer File.
If you just want to create an answer file and manually run through the Windows installation each fourth dimension you pull your FOG Image to a new client, you tin can just go ahead and go along with saving the file. If you lot want to fully automate your installation procedure, I can recommend this article which helps you to fully automate your Windows 10 installation. I won't encompass all those steps here.
Click on Tools -> Validate Answer File when you lot are ready.
From here on you tin can save your file by selecting File -> Save Answer File -> C:\customize\customize.xml
If y'all want to acquire how to hide this Customize Folder so your users don't see it, I got you covered!
Alright, finally we have everything prepare and we are able to run Sysprep!
Part 7.five (OPTIONAL): Remove concluding used Folder / Files
Considering nosotros concluding used our customize.xml file, the user who logs in afterward the Image was practical to a automobile, volition still see this file in the last used file section of the Windows Explorer. To prevent that, we tin implement a little script that volition remove that.
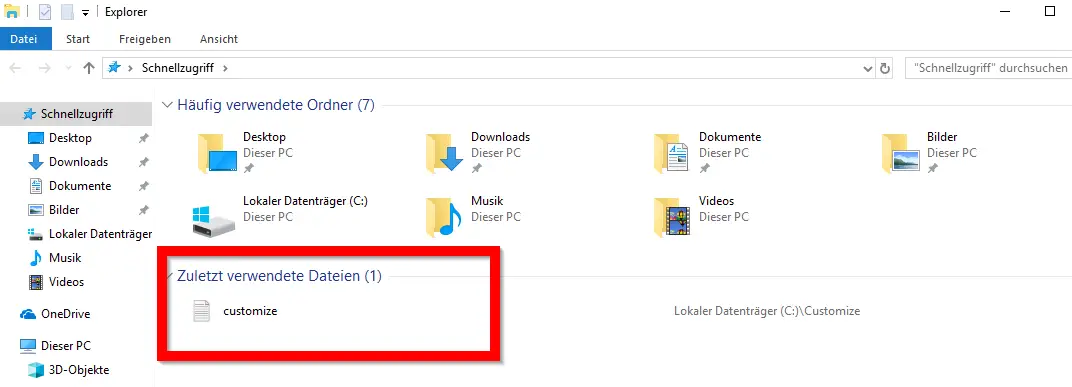
The script will just run once and delete itself afterward.
To do that, navigate to %appdata%\Microsoft\Windows\Start Menu\Programs\Startup and create a file called runonce.bat , make certain the file extension is correct and not .txt. Edit the file and paste the post-obit code:
echo Y | del %appdata%\microsoft\windows\recent\automaticdestinations\* del %0
Code language: PHP ( php ) This will solve the problem.
Function viii: Running Sysprep
Brand sure you take everything ready equally you want it to be. This will generalize your paradigm.
Take A SNAPSHOT NOW! You tin after revert back to this snapshot in case you desire to change software, update windows, alter your answer file, and so on.
Subsequently taking a Snapshot, you can go ahead and delete the C:\customize\Win10 binder to save you some deejay space, or, you remove information technology later after installing the image on a client.
Hit the Windows Fundamental, blazon in: cmd, and correct-click Run As Administrator.
Navigate to the Sysprep directory by typing:
cd c:\Windows\System32\Sysprep

End Windows Media Networking Service to avoid errors during Sysprep past typing:
net terminate wmpnetworksvc
It never was actually started for me, but it might exist for you. But do it to be rubber.
Now we showtime Sysprep. After running the command, Sysprep will prepare the Image, DO Not DO ANYTHING WITH THE Figurer WHILE SYSPREP IS RUNNING!
sysprep.exe /generalize /oobe /shutdown /unattend:C:\customize\customize.xml


After Sysprep is finished, shut downwardly your estimator if information technology doesn't do it past itself.
Congratulations, now you take your Generalized Windows 10 Image.
Anytime you want to exercise changes on this prototype, like update Windows, Install new Software, change Software, or any, simply go back to that one Snapshot you lot took before running Sysprep, brand changes, and run Sysprep again.
Part 9: Capturing our Image with FOG Server
Alright, finally fourth dimension to get our FOG Server back into play!
Make sure your FOG Server is running, if y'all set everything up correctly, we should be done in no fourth dimension now!
First, log in to your FOG Spider web Interface and head to Images.
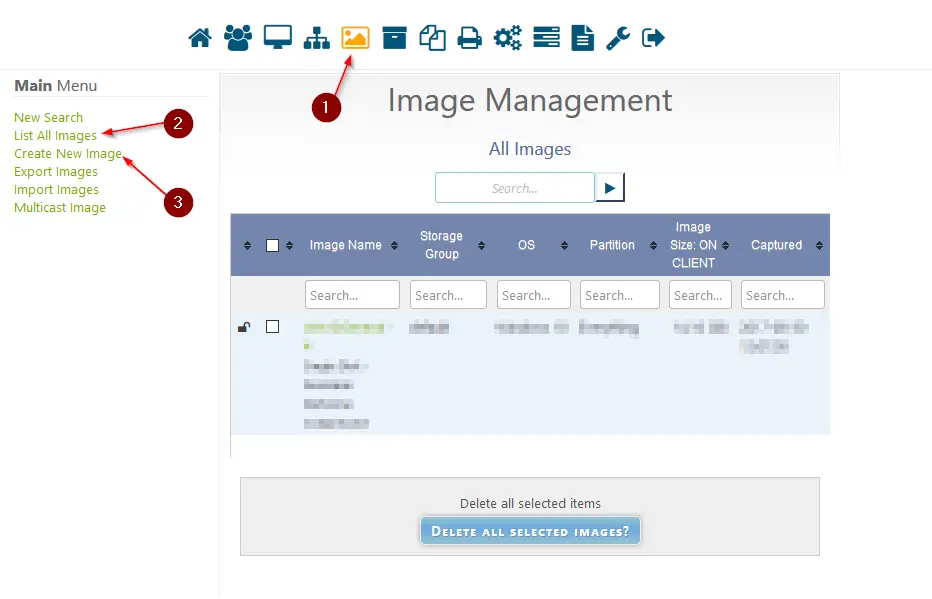
Click on Create Image and adjust everything like in my screenshot.
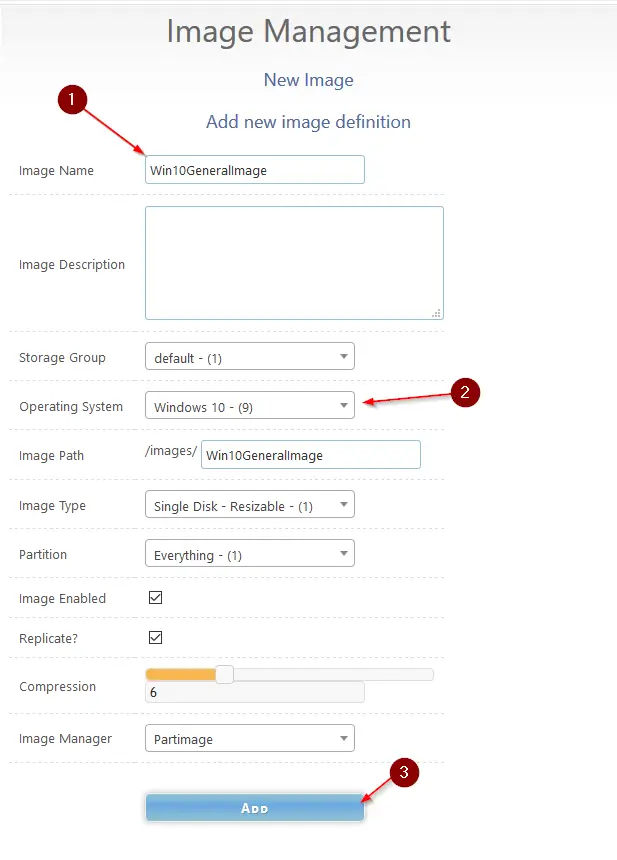
It might audio a bit counter-intuitive, but you have to outset create an Image in the Database of FOG to be able to capture it. I had to wrap my head effectually information technology at starting time too.
Alright, fourth dimension to register our Windows x host in FOG:
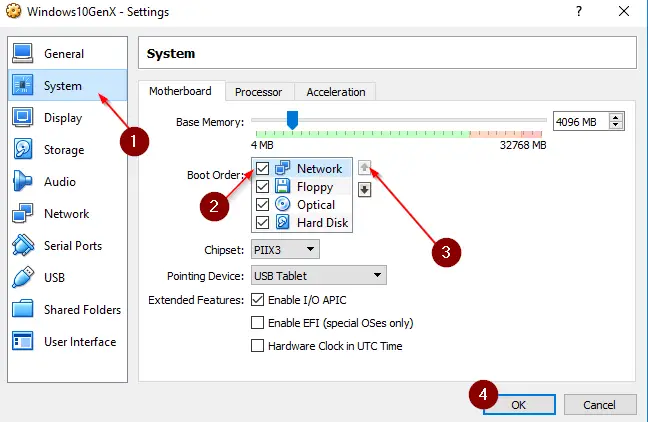
Select your Windows 10 VM and click on System. Make certain you have Network Kick Enabled in your VM and it's on position #1.
One more affair, make certain that Legacy Boot (not UEFI) is enabled on whatever computer you want to capture or deploy. I retrieve FOG supports UEFI already but I haven't looked into information technology yet.
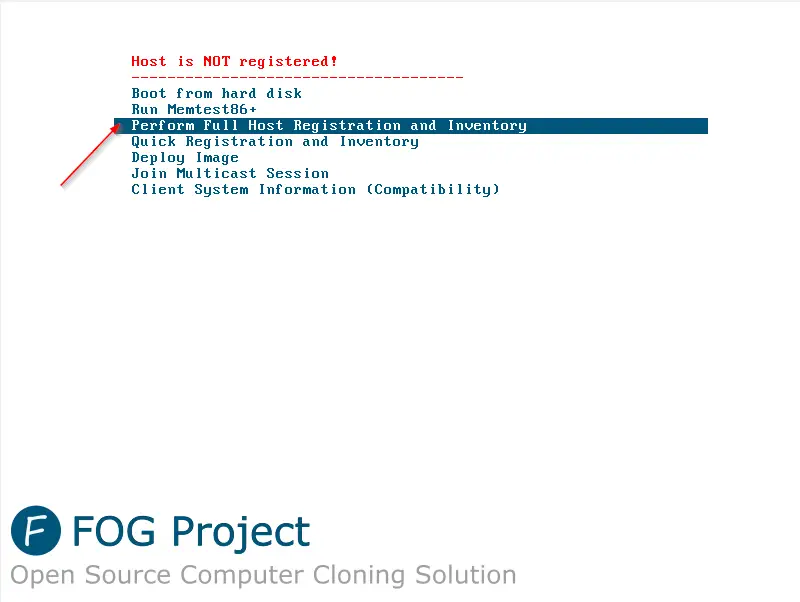
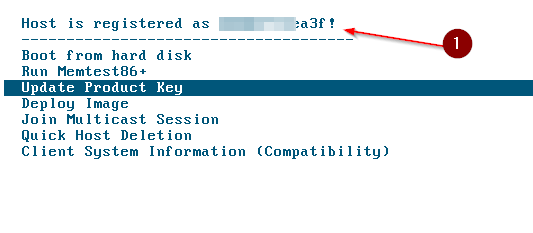
Fire up the client and you should end upward in your PXE Boot Environs.
Choose Perform Full Host Registration and Inventory.
Questions and Answers during the process:
- Enter the hostname for this computer:
- Enter your hostname, for example, Win10General
- Enter the prototype ID to associate with computer
- Ostend with Enter
- Would you like to associate this host with groups?
- N
- Would you like to acquaintance this host with snapins?
- Northward
- Would yous like to... a product key to this host?
- N
- Would... Join a domain?
- N
- Enter the primary user for this computer:
- Confirm with Enter
- Enter other tag #1
- Enter
- Enter other tag #2
- Enter
- Would you similar to deploy the prototype to this calculator at present?
- N
Phew... Questions over questions.
At present your Win10 General Image is registered in your FOG-Server.
Ability off your VM after the registration process is finished and the machine attempts to reboot.
Part 10: Capturing our Image
Conduct with me guys, just a few more than steps and nosotros are gold.
Back to your FOG-Server Web Interface.
Caput to Hosts -> List All Hosts and click on your Win10General Host.
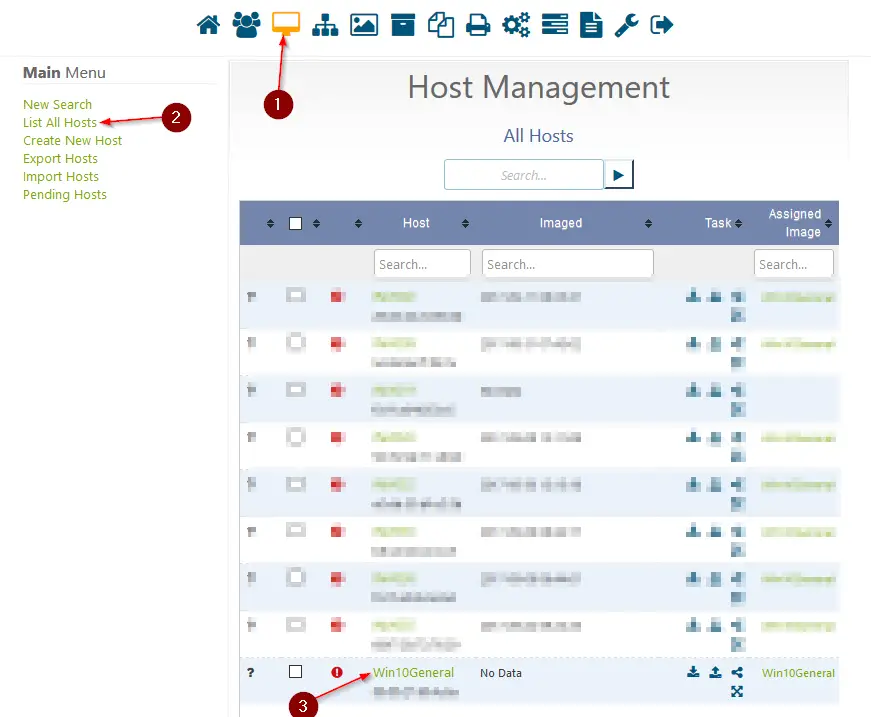
In instance your host is not listed nether its hostname, you can simply network kicking your Win10General VM once once more and await up its MAC Address, so rename it in FOG:
Afterward you select your host, cull your Windows ten General Image that you created earlier.
Don't mind the different names on the screenshots, just select what you created.
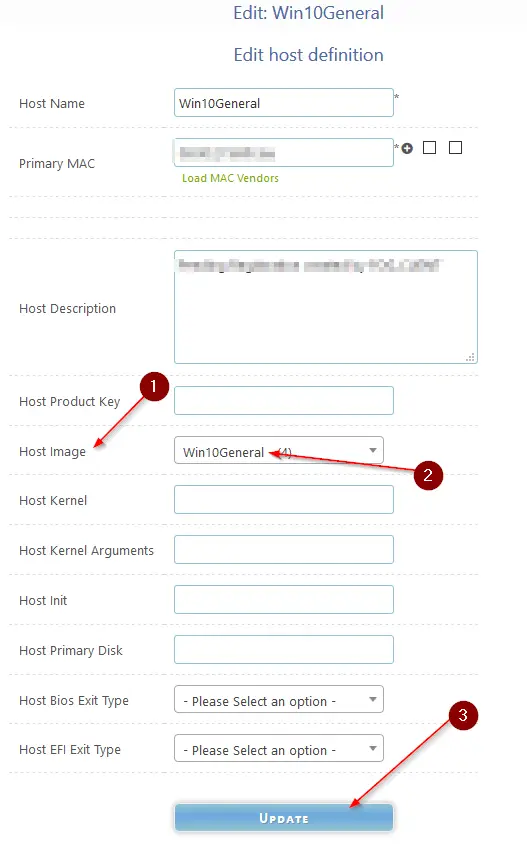
Click on Update.
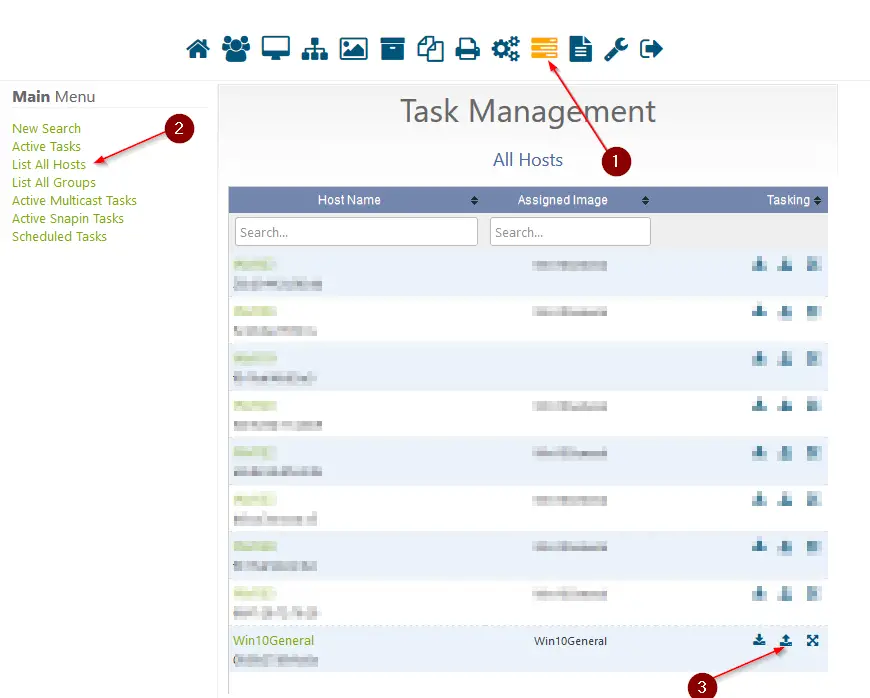
When that'due south done, Navigate to Chore Management -> List All Hosts and click on Capture next to your Win10General Host.
Head dorsum to the System tab in your VirtualBox VM. You should now have Network on first and Difficult Disk on the second position:

Now outset your VM. The Image Capturing process starts automatically.
After the capturing procedure is finished, merely switch off your Win10General Host until you need to have some changes done on it again. It can rest for now.
Caput over to Images and click on All Images in your FOG-Server Web Interface.
If all went well, you should now see that your Win10General Prototype grew to a certain size.
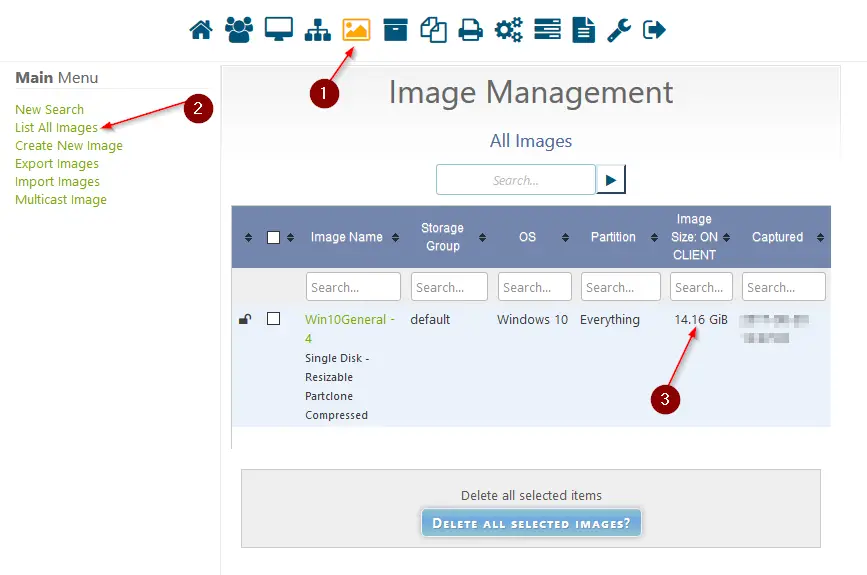
This means that the capture task was completed successfully.
Function eleven: Deploying the Paradigm
Yous probably have guessed it by now.
The Deploying process is very unproblematic now. I won't stride by step screenshot it for you because if you lot accept followed through everything before, it should be a breeze for you.
- Boot a new client via PXE Boot.
- Perform a Full Host Registration.
- Cull a Hostname
- You can at present already determine if yous want to associate an Epitome ID with this computer. Press ? to list all Epitome ID'southward and choose the one y'all would similar to deploy. You can also Non practice this and acquaintance an Paradigm with the host registration via FOG-Web Interface. Y'all select the Host, associate the Win10General Image to it and caput to Chore Management and cull Deploy Epitome. That'due south style more steps, so I ever opt for Associate Epitome ID with this computer already here.
- On the last question of the registration process: Would you like to deploy the Epitome to this Calculator now? You choose Yes.
That's it. Now FOG will deploy the Image to your computer fully automatic.
I hope those last steps are clear. It's far easier to simply associate an Image ID within the Host Registration Process than doing everything via the Web Interface. Saves a ton of time.
Decision Create Windows 10 Paradigm for Deployment with FOG Server
If you stick effectually until hither, congratulations, you lot have a fully operational, Gratis Imaging solution upwards and running!
I use FOG for a while at present and I'1000 even so very satisfied with how easy information technology is once it's running.
I will keep using it until I need a dissimilar solution one twenty-four hour period.
I really hope I didn't miss out on any steps, this is a monster of a tutorial, if so, please let me know in the comments! The video is coming before long too! Subscribe to my Channel to be certain to get informed!
Thanks to the User "ICT" below in the comments, I tin can share a chip of boosted information with yous regarding the whole setup with Windows Server and a couple of other options.
He pointed out:
Great tutorial, with a few bugs for me and a concluding question to you lot.
Question: Does this also work for multicast, I can't configure information technology. Multicast does the chore just afterwards Windows boots, I go the fault in the Windows installation that something has gone wrong…Bugs and answers:
– If y'all work with Windows Server DHCP, please actuate in DHCP Scope Options 66 with value ip-address fogserver and 67 with value undionly.kpxe
– Cull in VirtualBox besides with Clipboard for bidirectional
– Install on the client Fog Client and uncheck enable Fog Tray and give the Server IP-address in the box on height
– If y'all piece of work with Windows Education, replace in the Answer file with Didactics and not EDU
Thank you once again, buddy!
More additional Windows Server DHCP Information from some other reader, Dylan P.:
How-do-you-do Stefan, I followed your guide for the setup and configuration of FOG with a Windows ten Pro paradigm and I take been using Windows Server to handle DHCP with virtual machines to run FOG and capture the deployment paradigm. Information technology really took some fourth dimension to become the DHCP server policies setup correctly and I wanted to share some of the specifics that I have been using with the promise of benefiting others that may be having similar bug.
Note: Option 66 and 67 need to be enabled for PXEClient:Curvation:00000 (DHCP Director > T310-Demo.TestRealm.lcl > IPv4 > Policies > PXEClient:Curvation:00000 > Options > DHCP Standard Options > …) FOG DHCP Settings https://wiki.fogproject.org/wiki/index.php/BIOS_and_UEFI_Co-Existence
---------------------------------------
Expand DHCP server Right click IPv4 Select Define vendor classes Click Add Echo for each of the post-obit: PXEClient:Arch:00000 PXEClient:Arch:00002 PXEClient:Arch:00008 PXEClient:Curvation:00009 PXEClient:Arch:00007
----------------------------------------
Aggrandize DHCP server Expand IPv4 Correct click Policies Select New Policy Name/Desc: Allow UEFI PXE handout Click Adjacent Click Add together Criteria: Vendor Class Operator: Equals Value: Select each of the following, check Suspend Wildcard, and Click Add together PXEClient:Arch:00007* PXEClient:Arch:00008* PXEClient:Arch:00009* Click Ok Click Next Select Selection 067 from DHCP Standard Options Set String Value to: ipxe.efi
----------------------------------------
Right click Policies Select New Policy Name/Desc: PXEClient:Arch:00000 Click Next Click Add Criteria: Vendor Course Operator: Equals Value: Select each of the following, check Append Wildcard, and Click Add together PXEClient:Arch:00000 Click Ok Click Adjacent Select Option 067 from DHCP Standard Options Set String Value to: undionly.kpxe
----------------------------------------
Name/Desc: i386 EFI kick Click Adjacent Click Add together Criteria: Vendor Class Operator: Equals Value: Select each of the post-obit, check Append Wildcard, and Click Add together PXEClient:Curvation:00002* PXEClient:Arch:00006* Click Ok Click Side by side Select Option 067 from DHCP Standard Options Fix String Value to: i386-efi/ipxe.efi
----------------------------------------
Thank you, Dylan!

How To Change Your Pxe Background Fog Server,
Source: https://www.ceos3c.com/sysadmin/create-generalized-windows-10-image-deploy-fog-server/
Posted by: rosenbergequed1960.blogspot.com
0 Response to "How To Change Your Pxe Background Fog Server"
Post a Comment